 Route Editor

| Guide | ♦ | 13 Triplogs | 0 Topics |
details | drive | permit | forecast | route |
stats |
photos | triplogs | topics | location |
| 128 | 13 | 0 |
Living on the edge by slegal A great loop option is the following route 9.7 mi / 3,925 aeg
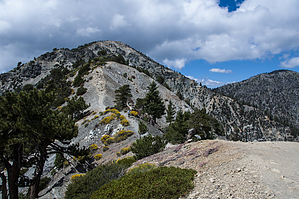
The Devil's Backbone Trail is the easiest route to the top of Mt. San Antonio. Why? Simply because it is the shortest route. This assumes that you ride the ski chairlift from the Mt. Baldy Ski Area parking lot to the ski lodge. This shaves 1,300 vertical feet off of the climb making for a manageable, albeit strenuous 2,300 vertical foot climb to the summit. Compared to the Baldy Bowl Trail with a vertical gain of nearly 4,000 feet, it isn't difficult to conclude that the Devil's Backbone is indeed the easiest route to the summit. From the top of the chairlift there are three routes to choose from. If you go straight (northeast) on the dirt road you'll be taking the longest route, but the least steep route. This route will turn sharply to the left and snake its way up toward the top of chair 4. The middle route heads up along the ridgeline beneath chair 4. This is the most direct route up, and also the steepest. The left most route stays to the left of chair 4, but you can join in on the winding dirt road for a little easier hike at one point. All three routes ultimately converge at the top of chair 4. The top of chair 4 officially marks the beginning of the Devil's Backbone Trail. From here the trail rises gently around a small knoll. Once you reach the other side of the knoll the trail begins to look a little more ominous. After a short downhill you have to make a short steep ascent. Take your time because there is still much ahead of you. You don't want to wear yourself out so early in the climb. After reaching the top of this first steep climb you are faced with another steep climb with an added twist. The trail wraps around Mt. Harwood and the steep slopes of Mt. Harwood create some steep exposure falling away from the trail on your left. If you have a fear of heights, this section will make you squirm. The trail is loose here so take your time. After rounding the exposed section you will continue up a moderately steep slope along the side of the ridgeline that tops out at Mt. Harwood. There will be a few places where you may need to use your hands to help you up over rocks. Be careful putting your hands on the rocks, because some of the granite is sharp enough to cut your hands. At about the point where you reach the 9,300 elevation the trail levels out giving you a nice rest. You'll travel on generally flat terrain for about a half mile. As you round Mt. Harwood the summit of Mt. San Antonio comes into view along with your final obstacle to the top. The final 700 vertical feet of climbing is a grind. It's relentlessly steep and the trail has lots of loose dirt and rocks that slow your progress. Don't give up now. You've made it this far. Just take your time and you'll make it to the top. Remember, if you go back down the Devil's Backbone it's almost all downhill from the top. So make that final push to the top. As the trail starts to level out at the top of Mt. San Antonio you are greeted by a series of round rock structures. If you happen to make your climb on a windy day the purpose of these structures will be immediately obvious. They are wind shelters. Among these wind shelters is a plaque anchored in the summit that reads, "San Antonio 'Mt Baldy' Elev 10,064". There is a peak register hidden beneath the plaque. Feel free to sign it, acknowledging your effort. Check out the Official Route and Triplogs. Note This is a moderately difficult hike. Leave No Trace and +Add a Triplog after your hike to support this local community. One-Way Notice This hike is listed as One-Way. When hiking several trails on a single "hike", log it with a generic name that describes the hike. Then link the trails traveled, check out the example. | ||||||||||||||||||||||||||||||||||||||||||||||||||||||||||||||||||||||||||||||||||||||||||||||||||||||||||||||||||||||||||||||||||||||||||||||||||||||||||||||||||||||||||||||||||||||||||||||||


