 Route Editor

| Guide | ♦ | 5 Triplogs | 0 Topics |
details | drive | no permit | forecast | route |
stats |
photos | triplogs | topics | location |
| 38 | 5 | 0 |
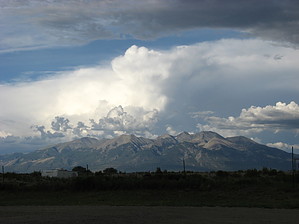
Hike from grasslands to alpine tundra and beyond! by Jim Hikers traditionally access Blanca from the west and the San Luis Valley. Depending on what you drive or ride, you will need to start hiking somewhere between 8,000 and 12,200'. If you have a 2wd, you will likely not get past 8000' and more than a mile or so up the Lake Como Road; if you have a stock 4wd, you will probably have to start somewhere between 8,000' and 10,000'. If you have an ATV and are skilled at its operation, you might make it all the way to the tundra and past Lake Como to begin at 12,200'. You may be nearly as successful if you have a heavily modified 4wd. It should be noted that the challenge or severity of the Lake Como Road is such that many people travel from distant parts of the country with their modified 4wd vehicles to drive up this road. It's a prevalent activity on Labor Day Weekend (as I discovered in 2007).
As you leave the alluvial fan segment of the road, you will encounter solid rock that begins to come to the surface. The first significant area of this is right in a switchback, and it is commonly known as Jaws 1/2 as it's not too difficult for most people to get past in a stock 4wd. It's still some distance from Jaws 1, which stops almost all stock 4wds. After Jaws 1/2, the road begins to enter the canyon, and there is a slight loss of elevation, which may or may not have some muddy water at the bottom. You climb out, and shortly thereafter, you encounter Jaws 1, an outcropping of rock that is 3 feet high. A little after that, you will come to the wrecked cabins from a ghost town constructed to aid the miners that worked near the peak. The road is narrow at this point. Soon after the cabins, you will encounter the first stream crossing. It's not too difficult to rock hop through the stream if the flow is not too high. Past the crossing, the road again climbs steeply. You'll come to Jaws 2 with its memorial plaque to the fellow who apparently died here when his vehicle overturned and fell down the embankment. The road continues to climb and rides along a rocky slope. You are now nearing Lake Como, and it's not much further to the area that most people will camp in if they choose to backpack up into the massif. Personally, I prefer to continue past the lake and camp in the tundra, but that's just me. From Lake Como, you can continue to follow the road up a steep slope and along a rushing alpine creek. Soon, the trees grow shorter, and things begin to open up as you approach the treeline. The trail/road goes over a small stream and loses a bit of elevation before the two-track road comes to a parking area, and only a thin single-track trail continues past that point. No vehicles are allowed beyond this point. You will cross another small stream and head up to a waterfall. Everything up to now was an easy hike. From here up, it's class 2 hiking or class 3 climbing if you choose. Class 2 hiking means that you might have to use your hands to balance yourself on unstable or steep portions of the trail. Class 3 climbing implies that you will need to use your hands to ascend the slope. The trail will climb up a face on the west side of the waterfall and top out near 12,500'. Vegetation becomes noticeably thinner as you follow the trail past several small lakes. You will then climb up several talus slopes with ledges between them on your way to the saddle. It is essential to stay on the defined trail(s) while heading up or down these slopes, as they may be wet and slick. If you lose your footing, you may be looking at a severe fall and injury. Look for the cairns in these areas and be careful. Soon you will come to the saddle. At the top of the saddle, you can peer over the abyss into the east valley. Some skilled climbers come up this side. Not me. Turn right and follow the limited cairns and a rough trail to the summit. The trail is more defined near the top and slightly off the summit ridge. It might be easier to find the trail on your way down (it was for me). In the two times, I've climbed Blanca, I stuck very close to the ridge and encountered the only class 3 climbing you will find on the standard Blanca Peak route. It's not very long, and it's little more than a small ledge near the top you have to pull yourself up and over. I found it fun. If you don't enjoy that sort of thing, stay lower on the ridge and look for the trail as you near the summit. That will keep things at class 2. Once on top, sign the registry if it has room, enjoy the views, and try to pick out the other 14ers that you can see from up there. *Hint* there are 3 others in the massif and several more visible to the north. Descending is best done on the trail, which can be found from a small gully on the peak's west side. Be very, very careful here. Last time up, I watched a man who was descending trigger a rock slide that sent what may have been 100-pound rocks hurtling downslope for about 1000' at top speeds that I estimated to be near 60 miles an hour. At one of the best points in the slide, one rock bounced up an easy 50 feet before arcing back down to continue. Cool to watch from a safe distance, but I bet that guy's colon had an encounter with masonry blocks. He was using hiking poles and must have let something slip. Putting your poles in your pack and using your hands for stability is probably a prudent choice at this point. Continue back to the saddle and down the way you went. Be careful again not to cut corners on the steep talus descents below the ledges; you might fall and regret it. I must have gone on a bad day because the last time I was up, a man fell coming down one of these ledges, or that is what I was able to determine from the newspaper article I saw a few days later when I was back in Alamosa. He suffered a collapsed lung and some lacerations on his leg and had to be rescued. It's not a very hard mountain or a very challenging one for climbing but don't underestimate it, especially if you are tired on your descent. Once below the waterfall, it's smooth sailing. This hike can be done as a day trip and a long one at that, but it is better as a backpacking trip. The first time I did this peak, I did it in one day. It took me 10 hours to do at a fast pace. I lost both of my big toenails from constantly stubbing my toes on the river rock on the descent. I vowed to do it again as an overnighter. When I finally did in July of 2008, I enjoyed it much more, and my toenails stayed intact. There is abundant camping around Lake Como, or you can find a spot higher up in the tundra. Two other 14ers are accessible from this area. Ellingwood Point and Little Bear are right there, and you might find that you wish to pick one or both of those up. FYI: Ellingwood is an easy class 2, but Little Bear is a technical class 4, so do your research if you plan to climb. If you do climb them, put together a triplog or a hike/climb description for them so we can all revel in your accomplishments. Check out the Official Route and Triplogs. Note This is a difficult hike. Arrive fit and prepared or this could get ugly. Leave No Trace and +Add a Triplog after your hike to support this local community. One-Way Notice This hike is listed as One-Way. When hiking several trails on a single "hike", log it with a generic name that describes the hike. Then link the trails traveled, check out the example. | ||||||||||||||||||||||||||||||||||||||||||||||||||||||||||||||||||||||||||||||||||||||||||||||||||||


