Route Editor

| Guide | ♦ | 3 Triplogs | 0 Topics |
details | drive | permit | forecast | route |
stats |
photos | triplogs | topics | location |
| 45 | 3 | 0 |
The worst 8-10 hours that you will ever love by DixieFlyer This hike is a very grueling hike that involves some exposed class 3 and class 4 rock climbing and scrambling; as such, this hike should only be undertaken by experienced hikers/climbers who are not uncomfortable with heights. Overview Mount Borah Peak (elevation of 12,662 feet and prominence of 5,982 feet) is the highpoint of the state of Idaho. It is generally recognized as being the 5th or 6th most difficult state highpoint to summit.
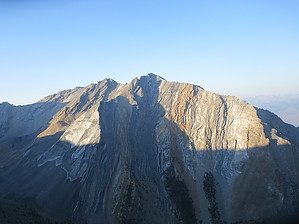
Time of Year to Hike The best hiking window for Mount Borah Peak is in the month of August. Snow from the prior year will generally be melted by August, and snow in the current year usually does not occur until after Labor Day. Time of Day to Hike As with most mountain peaks in the summertime, there is often a chance of afternoon thunderstorms. As such, you'll want to be well off the summit by noon. Many people will begin the hike before sunrise; 5:00 AM seems to be a popular start time, in which case you'll be hiking in the dark for about 1.5 hours. The trail in the early part of the hike is easy to follow, and with a headlamp, you'll find it easy to stay on the trail in the dark. Hike This guide assumes that you will be hiking when little or no snow is present on the route. Hiking in snow results in some additional considerations and challenges and is beyond the scope of this guide. From the trailhead, you'll be gaining elevation almost immediately. The first 3 miles of the hike are on an easy-to-follow trail that will take you to the fabled Chicken Out Ridge(COR). In the first mile of the hike, you'll gain about 950 feet in elevation; by the time you get to COR 3 miles in, you will have gained close to 4,000 feet in elevation. Once at Chicken Out Ridge, you will climb up to a notch. From there, you have 2 choices: 1)continue up on a ridgeline that is to your left for about 100 feet, or 2) descend a bit and traverse across down below the ridgeline to your left. Either option will get you to the same spot, but option 1 is more exposed and involves awkward moves. Thus, option 2 is your best choice. Once you do this traverse, you'll make your way to a well-defined social trail that goes below the ridgeline to the north. This is relatively easy class 2 or 3 hiking. You follow this trail to a "white gully", where you turn right and go up to the COR ridgeline. This is a relatively easy class 2/3 climb up the ridgeline. Once at the ridgeline, turn left and go about 50 feet to the crux of COR: a 20 foot near vertical downclimb. The rock is solid on the downclimb, and there are good handholds/footholds. However, you will be going down "face in", which might be uncomfortable for some people. The downclimb will take you to a seasonal snow bridge, which is a snowfield on a saddle. If there is no snow on the route, you have an option to making the downclimb: go back about 2/3 of the way down the white gully and traverse to your right to the "frozen dirt gully". This is an easy class 3 traverse with virtually no exposure. Once in the frozen dirt gully, make a fairly steep ascent up to the aforementioned seasonal snow bridge. It might be helpful to visualize this option by looking at this photo. The green line in the photo shows the standard route from the trail up the white gully to the ridgeline and then the 20-foot vertical descent down to the saddle at the seasonal snow bridge. The orange lines show the traverse down to the frozen rock gully and the climb up the frozen rock gully to the seasonal snow bridge. Note that the ascent up the frozen rock gully is steeper than it appears in the photo, but it is doable. Note: Do not attempt going in the frozen rock gully if there is snow in it -- you'd stand a good chance of glissading down a very, very long way and could be seriously injured or even killed. Now that you are at the seasonal snow bridge, you are past COR. You still have a lot of work to do to get to the summit, but there is nothing worse than class 2 climbing at this point. There is a decent trail for much of the route, but some sections with scree and talus make it a bit difficult to follow the trail at times when going up. The trail levels out for a bit once past COR, but then it steepens as you approach the summit: you'll gain 900-1,000 feet in the last half mile or so to the summit. Enjoy the views at the summit, relish in your accomplishment, and then go back the same way you came up. It is reasonably easy to follow the trail from the summit back to COR, as for the most part, you can easily see the trail down below you. Once back at COR, you'll have to upclimb the 20-foot near-vertical wall. Going up the wall is much easier than going down it: the rock is solid and stable, and there are plenty of good handholds and footholds. Once you get back off COR, the descent can be brutal -- your knees and quads will likely feel it the next day. Most will appreciate having used trekking poles on the descent. Camping There are about 5 primitive campsites at the trailhead. There is no water, but there is a vault toilet. Fees There is no fee for hiking; however, a $5 fee applies if you camp at the trailhead. Synopsis This is a tough, tough hike, and it would be foolish to attempt it unless you are in really good physical condition. Chicken Out Ridge is not as bad as it is often portrayed, but there are a couple of class 4 sections on it. Some hikers will say that Borah is the most brutal hike they have ever done; others will complete the hike and wonder where COR was. The truth is likely somewhere in between. Check out the Official Route and Triplogs. Note This is a difficult hike. Arrive fit and prepared or this could get ugly. Leave No Trace and +Add a Triplog after your hike to support this local community. | ||||||||||||||||||||||||||||||||||||||||||||||||||||||||||||||||||||||||||||||||||||||||||||||||||||