Route Editor

| Guide | ♦ | 2 Triplogs | 0 Topics |
details | drive | permit | forecast | route |
stats |
photos | triplogs | topics | location |
| 77 | 2 | 0 |
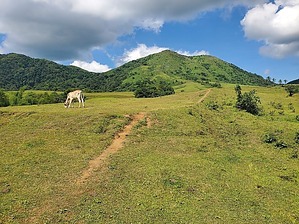
Jungle adventure and a piece of paradise by Mike_W Mt Talamitam is a great hike in a tropical place with a bit of everything. The trailhead is about a 2-hour drive South of Manila in the Philippines. The hike offers a primitive bamboo bridge crossing a stream, steep slopes through a jungle, a grassy plain with animals grazing, farming plots, vendors on the mountain selling drinks and snacks, and a summit with a memorial and small shelter. This hike could be completed by a beginner hiker with energy and determination. It's best to start early in the morning to avoid the extreme humidity of the daytime. I would say the hike is probably shaded for 40% of the way and 60% is exposed. Where to stay There are many options, but I stayed the night before at the Purple Orchid Bed & Breakfast which was about 32 USD per night including breakfast. I would rate this hotel stay as very good and I would stay there again. The hotel was closer to Tagaytay and there were some nice restaurants nearby but nothing within walking distance. Getting to the trailhead from the hotel was a bit expensive. It was approximately 21 km from the hotel to the trailhead and the hotel was able to find us a tricycle driver to do the roundtrip drive for about 27 USD. It would be more economical to take a bus from Manila or possibly more economical to take a grab taxi from the hotel if that option is available.
Hike This was a very exciting and fun hike which I did for the second time. My only regret was getting there as late as I did (~11 a.m.). It was incredibly humid between 11 am and about 2 pm in early November which slowed me down a lot. After 2 pm there was a bit of a breeze and the sun went behind the clouds. The weather is pretty consistent all year round as it's a tropical climate. I got to the trailhead around 11 a.m. and paid the 25 peso registration fee (roughly 0.50 USD). I was told that a guide was available for 600 pesos (or about 11 USD). I decided to skip the guide because I basically knew where to go and I also had a GPS plot that I found online somewhere. I only made one wrong turn, which took me about 10 minutes out of the way, but then turned back around and found the correct way. From the registration point, start by hiking North, then Northwest down the road which is paved on the steep parts. After 0.5 miles you will see a campground area where showers are available for a small price. There are camping spots here also, which I may have been interested in if I didn't have a lot of luggage with me. Pass the campground area and continue for another 0.1 miles before you encounter a concrete bridge going across a stream. Cross the concrete bridge. Shortly after crossing the concrete bridge, you will see a primitive bamboo bridge crossing a stream to your left. You will exit the road at this point and carefully cross the bamboo bridge. This was quite fun and interesting for me as I had not seen many bamboo bridges like this before. Once across the bamboo bridge you will turn left and follow a trail for about 100 feet. Next, look for a trail branch leading UP. This is what you will need to take to get to Mt. Talamitam. Continue up the steep jungle trail for 0.3 to 0.4 more miles. You should see a clearing and a bamboo bench. This was a good place to rest and get some needed water. I continued from here and noticed that the trail opened up more and there were fewer trees and more grass. I saw some grazing cattle and then after getting higher up saw some goats and horses. Most of the goats roam free, but the cows and horses have a leash and can only travel so far. Along the trail, there were some vendors selling water/drinks at various spots along with some farmers/ranchers. Soon, the peak will come into view and you will see basically where you will be hiking to. In some places, you won't see a trail, only grass, so just keep walking UP. You will pass a few agricultural plots on your left and as you get higher up you will see a treed area with some primitive bamboo structures. A trail leads toward a small store where they sell water, Gatorade, and snacks. The guy operating the store had a few roosters, a cat, and a dog. It was hard to believe there's a store way up in this mountain but I suppose they make enough money to keep it operational. I met a hiking group of about 5-6 people who stopped at the store area to rest while they were coming down. They said they started at 5 a.m. and did 3 summits of a total of 3 peaks (including Apayang and one other, perhaps Mt Lantik). It would have been much more comfortable had I started at 5 or 6 a.m., and I would have included the 3 peaks in my hike but there was no time today. I continued past the store and the trail continued up toward the summit. From here, the trail wrapped around the mountain and there was some more needed tree cover. I also saw some bamboo growing in this area. Looking at the topo map, I believe there were 2 possible ways to summit. When I did this hike in 2017, we had a guide and ended up taking the shorter steeper route. This time, I took the more gradual route which was slightly more scenic. When I got close to the top, I saw a lot of grass and noticed that there wasn't much shade at the summit. On the summit, there was a sign marking the peak and elevation, a memorial, and a small shelter with a bamboo bench. Because of the insane humidity, I stopped for 30 minutes and drank almost everything I had - four seasons juice, Pocari Sweat (like Gatorade), and a few smaller bottles of water. I also ate 4 kiat kiat, which are like mandarin oranges or "California cuties". I took my photos and left the summit around 1:30 p.m. Not long after leaving the summit, it was great to get back into the jungle where I could get a little more shade. Not far from the summit, I found the "shy plant" which would fold up after being touched. I don't know the Tagalog name for this plant but I was told it was not so rare. I remember this plant from before when I was on this mountain. There's another plant that looks very similar which does not have this behavior. I captured some nice videos of how the shy plant reacts. When I got back down to the store, I stopped and bought a small cold Gatorade for 60 pesos which is slightly over $1 USD, and guzzled it. Then, I continued down the same way I came, stopping to take photos of some of the animals and views. After about 2:30 or 3 p.m., it felt a lot cooler. I felt a sprinkle of rain after getting back to the road across the bamboo bridge. Then, the rain came just before I got to the registry area. I would have preferred to have a light rain while I was on the mountain but that could have made things a bit slippery. There were only a few muddy spots about 20-30 minutes after crossing the bamboo bridge. Higher up the trail, it was mostly dry. In summary, this was one of my favorite hikes in the Philippines and I would do it again someday. If you are new to hiking in the Philippines, also try Mt Batulao, Taal Volcano (if safe since it did erupt in 2020), and Mt Maculot. On this vacation, I also wanted to hike Mt Pico de Loro, but was not able to because they required a reservation and there simply wasn't an available date - quite frustrating!! Check out the Official Route and Triplogs. Leave No Trace and +Add a Triplog after your hike to support this local community. | ||||||||||||||||||||||||||||||||||||||||||||||||||||||||||||||||||||||||||||||||||||||||