Route Editor

| Guide | ♦ | 1 Triplog | 0 Topics |
details | drive | permit | forecast | route |
stats |
photos | triplog | topics | location |
| 30 | 1 | 0 |
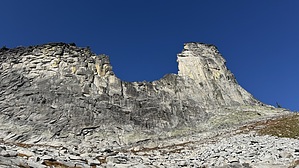
embrace the adventure by LindaAnn Hike: Starting from the Chimney Rock Trailhead, the trail heads west and is marked with a sign stating the trail is #256. A bridge immediately crosses the Pack River, then the trail heads to the southwest. Another bridge crosses Thor Creek, then the trail turns more southerly. The first 1.80 miles are on an old road, with minimal elevation gain.
At about 2.50 miles, you'll cross an unbridged creek. In late summer/early fall, you should be able to easily keep your feet dry. Early summer may be more challenging with the snowmelt. You might notice a fork here (it seems to be fading with time), so stay on the right fork, on the obvious trail, continuing uphill. Shortly before 3 miles, you'll pass between some large boulders, basically glacier garbage; after these boulders, the trail becomes much rockier, steeper, and rougher. Embrace it, because the next several hours are going to get tougher. You'll cross Chimney Creek at about 3 miles, again, easy to keep the feet dry except during snowmelt. You probably don't want to be on this trail that early in the summer, so it shouldn't be an issue. After Chimney Creek, the trail starts to wind around more as it heads uphill. The trail condition deteriorates as you climb, but is still mostly easy to follow. Eventually, the dirt trail becomes more of a granite trail, and well-placed cairns keep you on track as you head west and up. Hiking across the granite is kind of fun, but will make you glance at the sky to make sure no rain is imminent. Finally, Chimney Rock becomes visible for the first time on the hike. Continue uphill, following the cairns when needed. For a while, the rock doesn't seem to get any closer despite your progress. Around 5 miles, the granite trail starts to gradually shift to a trail of granite boulders. You'll cross about 50' of boulders, back on a trail, then a notable boulder field. There are cairns across this boulder field, but I ended up making my own route. On the way up, I stayed below the cairns, which I'm not sure was the best choice, but it was doable. Luckily, at this point, Chimney Rock finally looks a lot closer to you. The route gets easier for a few moments before reaching the final boulder field below the base of the rock. You'll notice a large patch of much lighter-colored granite on the left face of Chimney Rock--this is the result of a large section breaking off (a few years ago) and crashing into the basin you are about to be hiking through. At this final boulder field, I kept working my way through the boulders, aiming for the saddle to the left of the rock. There are cairns that keep you on a decent path, but they probably won't be followed perfectly. Carefully work your way through the boulders, testing for loose rocks before trusting your full weight on anything. You can see an angled line ahead of you that leads up to the saddle on the right (north) of the rock. Keep heading for that line, below the left saddle. Once you finally reach that line, the trail appears again. Turn right, and follow the narrow trail up that line to the north saddle. Chimney Rock is looming directly overhead at this point. Once at the saddle, you have made it to the Selkirk Crest and views open up in nearly every direction. There are plenty of places to sit and rest while enjoying those views. There is a trail that continues around the north side of Chimney Rock, before curving around the west side of it and up to that south saddle, eventually reaching Mt Roothaan to the south. That is the west approach, which can be accessed via the western end of Trail 256--much rougher drive, but a shorter hike, to be explored at a future date. Once done at the saddle, head back downhill. Once above the boulder field, I took the use trail a little farther south, which gives a unique view back towards Chimney Rock. It is surprisingly skinny from this angle, sort of a wedge shape. From there, I carefully made my way down through the boulder field, taking a slightly different route, but it seemed more efficient than my ascent. Once back on the trail, the route was fairly easy to follow, thanks to the cairns. My route through the lower boulder field was slightly different as well. While I had stayed below the cairns on my ascent, I stayed above the cairns on my descent, which seemed to also be somewhat better. After that, the rest of the hike back to the trailhead gets progressively easier. Note/Warning: I would recommend this hike only be attempted on a day with no rain or lightning in the forecast. Lingering ice/snow in early summer or late fall would also make things treacherous through the boulder fields. I would discourage bringing dogs on this hike, and I would also discourage bringing younger children. That being said, it is a gorgeous hike with amazing views, and well worth the effort for anyone who likes a fun challenge. Wear grippy shoes. Check out the Official Route and Triplog. Note This is a more difficult hike. It would be unwise to attempt this without prior experience hiking. Leave No Trace and +Add a Triplog after your hike to support this local community. | ||||||||||||||||||||||||||||||||||||||||||||||||||||||||||||||||||||||||||||||||||||||||||||