Route Editor

| Guide | ♦ | 30 Triplogs | 1 Topic |
details | drive | no permit | forecast | route |
stats |
photos | triplogs | topic | location |
| 380 | 30 | 1 |
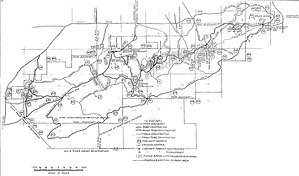
The Original HansenAZ’s SoMo Peddle Around… by Randal_Schulhauser  Setting the Stage Setting the StageAfter posting a mountain bike trip report for one of my big loops on the South Mountain trails, I received an online comment from HansenAZ suggesting I was ready to take on a “SoMo Peddle Around”. After completing my first “SoMo Peddle Around”, I was “intrigued” and did a little background research. Much to my surprise, the circa 1934 South Mountain Park/Preserve Master Plan Map plots out a route for “Park Circle Drive” (see Find#205 on the map) that for the most part, follows the same path as this hike/bike description. Talk about incredible foresight! Some History The Sunday April 6th, 1924 edition of the Arizona Republican chronicles the intention of Phoenix City Commission to; ”Purchase 14,000 acres to create a municipal park in the Salt River Mountains”. At a selling price of $1.25 per acre, the City of Phoenix led by J. C. Dobbins purchased the land from the Federal Government and named Charles M. Holbert the first Park Superintendent. The park was touted as; ”A a pleasure resort for the people of Phoenix” in a March 1929 cover story for Arizona Highways.
During the 1930s, at the height of the great depression, mining and prospecting accelerated at South Mountain Park to unprecedented levels. The year 1935 proved to be the most productive for the mines with the Max Delta being the fourth-largest producer of gold in the United States, yielding 1,423 ounces. Mining has always been a contentious issue at South Mountain Park, subject to a procession of lawsuits and legal challenges. By 1993, the City of Phoenix received the deeds to the remaining patented claims on the property and set about rehabilitating the land. By 1938, South Mountain Park was becoming world famous with local cartoonist Reg Manning's illustrated stories gaining much recognition on the way to Pulitzer Prize status. With the start of World War II, there was an abrupt end to CCC projects in South Mountain Park. The official 1942 park map allows you to imagine what the preserve looked like 71 years ago. The post-war boom brought many changes to South Mountain Park and environs. A frequent set location for 1950's Westerns and a preferred proving ground for the automotive industry. The official 1964 park map allows you to mentally picture what the preserve looked like almost 50 years ago. You can find the Scorpion Gulch Trading Post, the Natural Bridge, and Entrance Area all on this map. Fast forward to the 2013 park map and it's amazing how many “core” features still remain true to the original 1935 Master Plan map. Makes you wonder if that “core” will be affected by the 2015 proposed changes… The Present Day SoMo Park Circle Drive/Hike/Bike Route HAZ has an extensive collection of South Mountain Hike/Bike options. This HAZ Hike/Bike Description will allow you to be transported both figuratively and physically back in time to see for yourself if the 1934 Master Plan for South Mountain Park lives on today. Check this out. 1. Mile 0.0 – There are many options as to where to begin the SoMo Park Circle Route. Reference both the 2013 map and the 1934 Master Plan map throughout as we will be tracing “Find #205 – Park Circle Drive” throughout this description. We'll use the Pima Canyon TH and the start of Desert Classic Trail to take advantage of the ample parking and relative closeness to I-10 and other freeways for this description. From the 48th Street Entrance to the Pima Canyon TH at South Mountain Park, you are actually following a segment of the Maricopa Trail. Take note of this, as the Maricopa Trail will intersect with SoMo Park Circle Route more than once or twice. There's water and restrooms at the Pima Canyon TH and Marcos de Niza Ramadas – take advantage of this making your final preparations before hitting the trail! Join onto the Desert Classic TH beside the south side ramada to start your SoMo Park Circle Route. Desert Classic follows the path marked out on the 1934 Master Plan Map for the Park Circle Drive. Travel 1.0 miles to the next notation. 2. Mile 1.0 – At Mile 1.0 and Desert Classic Post #11 you will intersect with the Beverly Canyon Trail. The first mile along Desert Classic will pass by Marcos de Niza rock and a Hohokam rock art panel before you rise up to a minor outcrop with a park bench looking out over trail. Travel 0.5 miles to the next notation. 3. Mile 1.5 – At Mile 1.5 and Desert Classic Post #17 you will intersect with the San Gabriel side trail entrance. East Western Star Blvd. and East San Gabriel Avenue provide access to this alternative parking option to start your SoMo Park Circle Route. Along this trail segment you will pass another intersection with Beverly Canyon Trail. Travel 1.4 miles to the next notation. 4. Mile 2.9 – At Mile 2.9 and Desert Classic Post #23 you will intersect with Corona de Loma – East Trail (AKA Young Man Trail). On this particular date there were remnants of an aerial survey marker beside the trail intersection. Travel 0.6 miles to next notation. 5. Mile 3.5 – At Mile 3.5 and Desert Classic Post #29 you will intersect with the Equestrian/Kachina side trail entrance. This side trail provides another parking option to start your SoMo Park Circle Route. Desert Classic Trail will circle around the large water reservoir as you continue your trek. Travel 1.5 miles to next notation. 6. Mile 5.0 – At Mile 5.0 and Desert Classic Post #47 you will intersect with the Warpaint South side trail entrance. This side trail provides another parking option along South Warpaint Drive to start your SoMo Park Circle Route. Travel 0.8 miles to next notation. 7. Mile 5.8 – At Mile 5.8 and Desert Classic Post #52 you will have completed a steady 150 foot ascent to the almost high point along Desert Classic Trail at 1561 feet. Take a break at the “Fred Flintstone” rock benches by Post #52. This is a frequent rest point for Desert Classic mountain bikers. Travel 0.5 miles to the next notation. 8. Mile 6.3 – At Mile 6.3 and Desert Classic Post #54 you will have completed the roughest section of Desert Classic Trail featuring two rocky wash cuts. One of these cuts continues to thwart my mountain bike technique always requiring a jump off the bike to make the climb. You also traverse the high point of Desert Classic Trail at 1581 feet. At Post #54, the trail heading to the south is Ray Road Access Trail. If you seek a mountain bike challenge, take this connector trail to the Diamond Ridge saddle. Continue along the ridgeline to the old helipad that serviced the old International Harvester Proving Grounds. Serious mountain bikers post their times online completing their climb to the helipad. Otherwise, head west along Desert Classic towards Post #59 and the saddle view of Ahwatukee and Telegraph Pass TH. Travel 0.8 miles to the next notation. 9. Mile 7.1 – At Mile 7.1 and Desert Classic Post #59 you will reach a saddle with views of Ahwatukee and Telegraph Pass. If you can pick out the sweeping curve of Desert Foothills Parkway, you can trace out the test track for the old International Harvester Proving Grounds. The Diamond Ridge/Goat Trail/Helipad side trail re-connects with Desert Classic at Post #59. Travel 0.6 miles to the next notation. 10. Mile 7.7 – At Mile 7.7 and Desert Classic Post #61 you will reach a wash with some wooden hydro poles that climb up the side of South Mountain (Mount Suppoa) towards the communication towers. Side trail to the south (left) follows the wash and joins Desert Foothills Parkway. There's another alternative parking option at the end of this side trail joining onto Desert Foothills Parkway at Altadena Middle School. The school parking lot frequently handles the overflow parking from the Telegraph Pass parking lot. Travel 0.8 miles to the next notation. 11. Mile 8.5 – At Mile 8.5 you will reach the Telegraph Pass junction noted by the textured concrete that will take you to the trail head parking along Desert Foothills Parkway. Taking a look at the 1934 Master Plan Map, you discover that it was proposed that a 300 foot tunnel be driven through Telegraph Pass to provide a vehicular short-cut joining Tunnel Road onto Park Circle Drive via the Main Entrance. Travel 0.4 miles to next notation. 12. Mile 8.9 – At Mile 8.9 you reach the Telegraph Pass TH parking lot. This is another parking alternative to start your SoMo Park Circle Route. There are also water and restrooms at the TH Ramada located in the center of the parking lot. Congratulations - you've completed the Desert Classic segment of the SoMo Park Circle Route – you've got ~20 more miles to go! Exit the TH parking and take Desert Foothills Parkway west. Travel 1.2 miles to the next notation. 13. Mile 10.1 – At Mile 10.1 you reach the Gila Trail TH located in the flood control basin as Desert Foothills Parkway transitions into 5th Avenue. As you pick-up speed heading downhill along Desert Foothills Parkway before joining onto the Gila Trail, imagine yourself test driving an International Harvester rig on this old proving grounds roadbed. Travel 1.1 miles to next notation. 14. Mile 11.2 – At Mile 11.2 you reach the Gila Trail junction with Pyramid Trail. Looking at the 1934 Master Plan Map, I believe the SoMo Park Circle Route is following the Gila Trail alignment (except for the trail head north leg). Continue southwest along the Pyramid Trail. Travel 1.4 miles to next notation. 15. Mile 12.6 – At Mile 12.6 you reach the Pyramid Trail TH junction with Chandler Blvd. The Pyramid Trail segment has already been described on HAZ. From the Gila Trail/Pyramid Trail junction at the switchbacks leading up to the National Trail, head southwest towards the Lost Ranch Mine Trail and Bursera Trail. The Pyramid Trail will lead you downhill to the Chandler Blvd TH parking. This is another parking option to begin your SoMo Park Circle Route. From the Chandler Blvd TH, take the old gravel jeep trail west towards West Shaughnessey Road and Ahwatukee Foothills Reserve. Travel 1.1 miles to next notation. 16. Mile 13.7 – At Mile 13.7 you reach the West Shaughnessey Road junction with the old jeep trail. The old jeep trail is a gravel link between Chandler Blvd and West Shaughnessey Road. Continue west along the pavement of West Shaughnessey Road towards the Gila River Indian Reservation border and metal hydro towers. Travel 0.8 miles to next notation. 17. Mile 14.5 – At Mile 14.5 you reach the end of the pavement for West Shaughnessey Road. Work around the “Dead End” barrier and continue along the desert trail towards the Gila River Indian Reservation border and metal hydro towers. Travel 0.4 miles to next notation. 18. Mile 14.9 – At Mile 14.9 you reach the South Mountain Park western border at the Gila River Indian Reservation demarcated by the metal hydro towers. I usually take a break at the rocky rise just below the hydro lines enjoying the view of the Sierra Estrellas. Travel 0.5 miles northwest climbing up the hydro right-of-way to next notation. 19. Mile 15.4 – At Mile 15.4 you finish a climb up to the south ridge of the hydro right-of-way on a 4WD path chiseled into the rock. Continue traveling northwesterly beneath the hydro lines 0.5 miles to next notation. 20. Mile 15.9 – At Mile 15.9 the hydro service road comes to a washout that you'll have to carry your bike over. Just before the washout you will see some collapsed buildings to the east – suspected evidence of mining operations from another era. Travel 0.4 miles to next notation. 21. Mile 16.3 – At Mile 16.3 the hydro service road climbs up the central ridge offering views of Dusty Lane, Vee Quiva Casino, and San Juan Road with Maricopa Peak rising to the east. Travel 0.3 miles to next notation. 22. Mile 16.6 – At Mile 16.6 you reach the start of Dusty Lane and an old mining road beside a vertical pipe of unknown purpose. I have taken Dusty Lane north from here to pick up the Maricopa Trail near Laveen and connect east over to San Juan Road. My preference is the old mining road heading east to join onto the National Trail and over to San Juan Road. Travel 1.0 miles to the next notation. 23. Mile 17.6 – At Mile 17.6 you join onto the National Trail at Trail Post #46 passing a couple of old mines along the way. The old Gila Trail passes one of the mines and connects to the National Trail south of Trail Post #46. Although I haven't taken this connector trail, it looks like you can pick up the old Gila Trail near the collapsed ruins by the washout near Mile 15.9. I'll have to check out this alternate path the next time. Travel 0.6 miles to the next notation. 24. Mile 18.2 – At Mile 18.2 you reach the Bajada Ramada just after crossing San Juan Road. Travel 2.3 miles to next notation. 25. Mile 20.5 – At Mile 20.5 you reach the closed gate for San Juan Road. At the time of this writing, San Juan Road is closed to automobile traffic. There is parking for about a dozen automobiles by the gate making this another possibility as a “Circle Route” starting point. From the gate, look over to the south to spot the remnants of Max Delta Mine and tailings. Travel 1.4 miles to the next notation. 26. Mile 21.9 – At Mile 21.9 you reach the South Mountain Park Ranger Station (originally built by the CCC in 1935 to serve as a museum). There are public washrooms available at the Park Ranger Station. There are also plenty of parking choices near the Ranger Station making this another possibility as a “Circle Route” starting point. Travel 0.7 miles to the next notation. 27. Mile 22.6 – At Mile 22.6 you reach the remnants of ”Scorpion Gulch”, an old-time trading post built in 1936 selling curios and other goods to tourists visiting South Mountain Park. Travel 1.1 miles to the next notation. 28. Mile 23.7 – At Mile 23.7 you reach ”Los dos Molinos” on Central Avenue at Euclid Avenue – a good place to catch a cold beverage and a light snack (NOTE: closed Sunday, Monday & X-MAS). Travel 0.4 miles to next notation. 29. Mile 24.1 – At Mile 24.1 you reach the Highland Canal Urban Trail crossing Central Avenue (just north of South Mountain Avenue). Travel 4.8 miles to next notation. 30. Mile 28.9 – At Mile 28.9 you reach the Highland Canal Urban Trail crossing Baseline Road (just east of 40th Street). Travel 0.3 miles to next notation. 31. Mile 29.2 – At Mile 29.2 you reach the ”undeveloped section” of the Highland Canal Urban Trail crossing Baseline Road (between 40th Street and 48th Street). Travel 0.6 miles to next notation. 32. Mile 29.8 – At Mile 29.8 you reach the Javalina/Beverly Canyon TH and parking lot. This provides another option to start the “Circle Route” and a mountain biking alternative route cutting south across South Mountain to join onto Desert Classic Trail at Mile 1.0. Travel 1.1 miles to the next notation. 33. Mile 30.9 – At Mile 30.9 you come to a traffic circle at the foot of landmark Ruster's Rooste BBQ Restaurant. Take 48th Street through the gated community along the bike path towards the Pima Canyon TH parking entrance. Travel 0.5 miles to the next notation. 34. Mile 31.4 – At Mile 31.4 you reach the Pima Canyon TH parking entrance at 48th Street. Travel 0.7 miles to next notation. 35. Mile 32.1 – At Mile 32.1 you return to your starting point at the Pima Canyon TH Ramadas and Desert Classic TH via a section of the Maricopa Trail. Congratulations – you've just completed the SoMo Park Circle Drive Route per the 1934 master plan for South Mountain Park! Summary: l have to give a “shout-out” to HansenAZ for alerting me about his SoMo Peddle Around. Without his prompting, I would have remained oblivious to the 1934 Master Plan for South Mountain Park and the incredible foresight that lives on today. Check it out for yourself. Enjoy!
Gate Policy: If a gate is closed upon arrival, leave it closed after you go through. If it is open, leave it open. Leaving a closed gate open may put cattle in danger. Closing an open gate may cut them off from water. Please be respectful, leave gates as found. The exception is signage on the gate directing you otherwise. Check out the Official Route and Triplogs. Leave No Trace and +Add a Triplog after your mountain bike ride to support this local community. | ||||||||||||||||||||||||||||||||||||||||||||||||||||||||||||||||||||||||||||||||||||||||||||||||||||||||||||||||||||||||||||||||||||||||||||||||||||||||||||||||||||||||||||||||||||||||||||||||||||||||||||||||||||||||||||||||||||||||||||||||||||||||||||||||||||||||||||||||||||||||||||||||||||||||||||||||||||||||||||||||||