Route Editor

| Guide | ♦ | 37 Triplogs | 1 Topic |
details | drive | permit | forecast | 🔥 route |
stats |
photos | triplogs | topic | location |
| 499 | 37 | 1 |
Canyons are inherently risky. Flash floods occur without notice on sunny days. Technical skills & surrounding topography knowledge required yet does not eliminate risk.
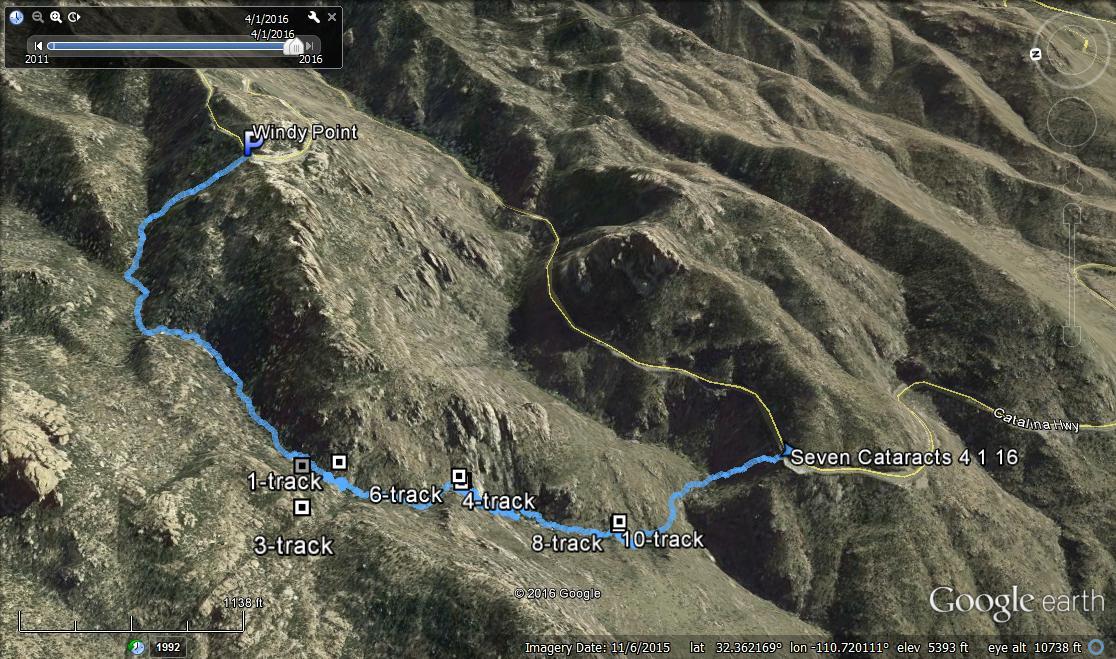
Water is the key by rvcarter   Introduction IntroductionOne of the definitions of the term “cataract” is a large waterfall. The Seven Cataracts are a series of waterfalls along the stream that passes through Willow Canyon, which eventually empties into Bear Canyon near the Seven Cataracts Vista on Mount Lemmon’s Catalina Hwy. This description covers the traversing of a portion of Willow Canyon from Windy Point to the Seven Cataracts Vista, which includes hiking, scrambling, and technical rappelling down four waterfalls along the lower part of the canyon. This description does not address two additional but less impressive “cataracts” further down Bear Canyon. Alternative Entry/Exit Points Our two trips began with a steep descent from the northernmost point at Windy Point down into the canyon. Some people have reportedly hiked west out to Nancy’s Thumb, a rock formation in a rock climbing area west of the Windy Point parking lot, and taken a faint trail down to the right. Both will take you into Willow Canyon.
Setting Willow Canyon is beautiful and impressive with its large Cyprus trees, lush vegetation, running water, and slickrock pour-offs. Eventually, you arrive at the first drop point (there are four between here and the exit to Seven Cataracts Vista) which requires technical rappelling. There are magnificent rock formations and rock walls all along the canyon. The vistas to the south at several points provide awesome views of Catalina Hwy, eastern Tucson, Thimble Peak, and the Santa Ritas. Take time between the drops to soak in the absolutely gorgeous canyon along the way. Rappelling The hiking and scrambling along the canyon are not extraordinarily difficult. Enough people have been down the canyon to beat in a faint trail for most of the way. You pretty much can’t get lost, since the canyon walls are so shear and vertical. All but one of the rappels can safely be done with a 200-feet rope, but the last one is about 120 feet into a large deep pool. Consequently, you need two ropes (we used two 200 feet ropes), or one rope and a pull cord. There are solid double anchors at the top of all rappel stations. Most will already have some webbing and either a rappel ring or screw oval in place from a previous user. You should evaluate each station critically and beef up or replace equipment as needed. The level of difficulty that one would encounter varies greatly depending on the flow of water through the canyon and the temperature. The trips we have made were in relatively dry to medium flow conditions. You will be hard-pressed to stay dry, even under the lowest of flows. In cooler months, you may need a wet suit. 1st Rappel – Look for the two bolt anchors on the left side. Most people split this awkward drop into two parts to stay under 100 feet. The upper part is simple enough but there is no avoiding the small pool at the bottom which can contain water up to 4 feet or so. In two trips, we have not encountered more than two feet of depth. Since we were using two 100-feet ropes, our leader stayed connected and worked his way over to a large boulder blocking the canyon further down and, after we were all down, set up a second rappel station around the pinch point of the large boulder for the last 25 feet or so of drop. With enough rope, one could drop all the way to the sandy floor, but be careful, there are several places to stick the rope (or the pull cord) if you pull all the way from the bottom. With wet shoes, the scramble over to and past the large boulder can be very slick. If there is a lot of water, I can imagine this drop would be quite exciting. Note: some writers count the second portion of the drop as a separate rappel, and indeed the count would not reach seven if this drop were not counted as two cataracts. 2nd Rappel – Anchors are on the right side after a short walk. The drop is easily less than 100 feet, but in all but the driest conditions will be extremely slick on the lower half, which includes a free drop of about 30 – 40 feet. Your feet and lower legs are already wet, so don’t worry about the scramble away from the wall in the small pool. Nice drop and much simpler than the first one, but if I recall correctly, the stance near the top anchors was a little awkward, so be careful reaching the anchor. 3rd Rappel – Anchors are on the left side. We descended along dry rock to a ledge that is less than 100 feet below the anchors, disconnected and scrambled to the right and down large boulders the last 40 – 50 feet to the bottom. If one had enough rope, they could rap to the bottom; this would be especially desirable if water was really gushing and made the boulders wet. 4th Rappel – Rappel #4 is a drop of about 120 feet from a set of anchors on the right side, with only one option for setting up an intermediate rappel station along the way. Most canyoneers will rig their 200-feet rope with a pull cord and truck on. On our first trip, we took 200- and 100-feet ropes, but no pull cord. There is a small ledge about 20 feet down from the top and a little to the right. Our solution, maybe not the best, was to tie our two ropes together and disconnect/reconnect our ATCs around the Fisherman’s Knot while hunkered onto the small ledge. I felt safe enough, but with more experience on the second trip, we took two 200-feet ropes and made the descent in one rappel which is safer. There is a large, deep pool at the bottom of Rappel #4. It is possible to avoid getting immersed in the pool by stopping the rappel just short of the water and working your way to the left. However, the footholds/handholds are small and your boots are wet and algae covered from the flowing water above. So…staying out of the water is not always assured (as one of our party found out). After Rappel #4 we exited the canyon by taking the pretty clear trail on the left side of the canyon. There are a couple of drops past this point, but they are reportedly less impressive, and by that time most people are ready to head out anyway. Follow the trail to an obvious crossing of the small wash that comes down the Green Slabs area and climb almost straight up to the Seven Cataracts Vista. If you’re going to the Green Slabs parking area, just keep going up the wash to the east. Whichever option you choose for entry/exit, this hike/climb will be a lifetime memory because of the exciting nature of the rappels and the beautiful canyon passed through. Gear Minimum personal gear includes a climbing harness, a belay/rappel device or figure 8, a helmet, and whatever clothing you need to stay warm and/or dry. During cold, wet seasons, a wet suit would be highly desirable. Take lots of extra webbing and at least five bale rings (should you need to re-rig each location). Needed also are a few locking carabiners and runners for tieing in safeties while connecting your ATC. Caution Canyoneering is inherently risky and should be attempted only by groups with one or more people experienced in canyoneering and/or rock climbing, and whose members have a relatively high level of fitness. Summit Hut, a Tucson hiking/climbing business, posts this advice: “Approach this and other canyoneering routes with caution and respect -- all the hazards of canyoneering can easily come into play, including the dangers associated with moving water, hypothermia, hyperthermia, wet slippery rock surfaces, unstable footing, and flash floods. A solid background in rappelling, anchor safety, rope handling, rescue technique, pack management, specific canyoneering skills, and hazard recognition is a must.”
Check out the Official Route and Triplogs. Leave No Trace and +Add a Triplog after your canyon trip to support this local community. | ||||||||||||||||||||||||||||||||||||||||||||||||||||||||||||||||||||||||||||||||||||||||||||||||||||||||||||||||||||||||