Route Editor

| Guide | ♦ | 1 Triplog | 0 Topics |
details | drive | permit | forecast | 🔥 route |
stats |
photos | triplog | topics | location |
| 87 | 1 | 0 |
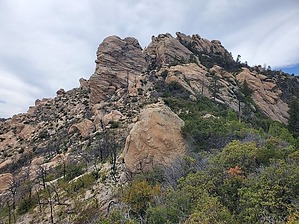
the cows will get you part way up by Mike_W   Overview OverviewThe Pinnacle Ridge high point, at an elevation of 7,550 feet, is the 2nd highest point of the Santa Teresa mountains with Mt Turnbull being the highest. The Santa Teresa mountains don't get a lot of activity because of their remoteness. The hike starts off taking the Cottonwood trail #66 which is not maintained and sometimes hard to follow. After that, there's no official trail, but there are cattle trails going up the ridgeline and then use trails after that. The Pinnacle Ridge HP has over 2,000 feet of prominence, so it's among a special group of only 73 peaks in Arizona that have this much prominence. The final 20 vertical feet involves some class 4 climbing with exposure and depending on your climbing abilities, you may want to use climbing gear. There's also an area near the top with 2 huge rock slabs that you'll need to wedge yourself through and climb up to get to the summit. Personally, I had a harder time doing that than the final climb up to the summit. Warning If you're not comfortable climbing steep areas with exposure this hike is not for you. Always go with someone else, be cautious of weather conditions, and don't take any unnecessary risks. Also, remember that you need to go down. Don't climb up anything that you think you may have trouble coming down.
To get to the trailhead you will need to drive through AZ State Trust Land. The ideal parking area also happens to be on State Trust land also, but as you hike north, within a few minutes, you will be on Forest Service land. Mt Turnbull is the highest point in the Santa Teresa mountains and access may not be legally possible because it is on the San Carlos Indian reservation. Hike Starting from where we parked, we walked a few hundred feet north on FSR 677 to an unlocked gate, which we crossed through. Just past the gate, we saw an old sign marking the Cottonwood Mt trail # 66 with arrows pointing forward. We didn't see a distinct trail but rather many cattle trails all around here. We were surprised to see a stream here with flowing water in May. There was evidence cattle were here and this was probably their main source of water. We continued north following Cottonwood Wash taking various cattle trails that seemed to be mostly on the east side of the wash. After about 1/3 of a mile, we crossed the wash and found some better trails on the west side of the wash. From here, we followed cattle trails until we hiked a total of about 0.8 miles. We could see a branch of Cottonwood wash that turned and went northwest. We found other cattle trails that went up the ridge from here and toward Peak 6420 which is part of Blue Ridge. We followed cattle trails to a saddle south of Peak 6420, then did an open country hike to the summit of Peak 6420 which was not far out of the way from our final destination of Pinnacle Ridge. We found a registry under a rock pile at the top of this peak and signed it. There were some burned trees here and we had some good views of the Pinnacle Ridge high point from here. We saw some other interesting rock formations further down the ridgeline. We also saw a large pond to the southwest which we believe was called Devil Tank. We left Peak 6420 heading north toward a flatter area with rock formations ahead. We hiked through various rock formations and headed towards the saddle east of Pinnacle Ridge, which didn't appear to be very high up from where we were. We continued climbing up toward the saddle. There were some messy areas along the way, but with some zig-zagging, we made it to the saddle. From here, we knew that the best route going toward Pinnacle Peak was to stay south of the rock formations and south of the dense Manzanita area. Shortly after getting to this saddle, the hike got messier, and steeper, and scrambling was involved. There were many areas where we needed to use our hands and zig-zag to get better footing. It's important to note that a wildfire had burned through this area in years past which must have produced a lot of loose dirt which was a sliding hazard. We kept going higher and heading toward the pinnacles. For the final 0.25 miles, we needed to go around the left side of one more huge rock formation. After doing that we had a clear look at the chute leading up to the high point. We hiked up the chute and had to do some scrambling to get to a gap where we could see on either side of the mountain. From the gap, there were two high points, each about 20 feet higher than where we were. One to our left and one to our right. We realized based on other people's photos and trip reports that the peak was to the right. Basically, the route curled clockwise at the very end. If you see anything that looks incredibly difficult to climb, it's likely that this is not the summit or you are going the wrong way. On the final section, I put gloves on to make the climbing easier. I needed to get myself through a slot where some gaps were going down. There was never a point here where I felt in any danger. Once beyond this section, I saw two rock slabs that I needed to get through the middle of. It was very narrow near the bottom, therefore I needed to put my back against the left side and feet against the right side and work my way forward and UP to the next section. The next section had even a smaller gap between the rocks which got larger after I worked my way up higher. I needed to wedge myself between the rocks and slide horizontally and UP roughly 4 to 5 feet. Once at that position, I had a flat area to rest and from here I was probably 10 vertical feet from the summit. I found good foot holds and hand holds going up with only some exposure. There was a slot in the middle that was somewhat protective and I felt like I didn't need any ropes or climbing gear here. Being tall helps in this area. I actually had a harder time squeezing between the rocks on the previous move before doing the final climb. The final climb was straightforward to me and not scary, but of course, I've done many climb sections on various hikes over the last 12-15 years. At the summit, there was enough space to sit down. It was very windy so we didn't stand for very long. We signed the registry and got some photos & videos from the top and then decided to head down. Getting down the climb section wasn't too bad for me since I'm over 6 feet tall. I sat down and spider crawled my way down the same way I came up. There was a large rock where I was able to stretch to and place my right foot to assist. Then, I used the foot holds and hand holds to get down to a flat platform area. Next, I needed to proceed between the rock slabs. This felt a bit scary because I was suspended between the rocks about 6 to 8 feet below the bottom and there was a potential of falling here and getting scratched up by the rocks on either side. I needed to inch myself across and down to the wider section below. This felt rather awkward because I needed to move from a narrow gap to a wider gap while having my body wedged in the middle, without any good hand holds. It took me about 5 minutes or more just to get past this section. If I had to do this again, I would have put my back against the other side of the rock (left side when coming down) which was one continuous slab, and therefore, it would have been easier to transition from a narrow wedge to slightly wider wedge by using my legs. After getting by that section I felt relieved because the hard part was over. Next, we basically continued down the way we came up. We stayed a little higher on the ridgeline in some areas which was slightly better, but there were some slippery dirt sections that we needed to go down. We found that staying more on the rocks was helpful. It took us roughly 1 hr 45 mins to get from the summit to the high saddle to the east. This was the hardest part of the hike, not including the climbing/obstacles at the top of the summit. After we got down to the saddle south of Peak 6420, we found some cattle trails heading southeast around peak 6161. We decided to take this shortcut down this other ridgeline because we thought it would save us some time and it apparently did. There were pretty good cattle trails the entire way down to and along the west side of, Cottonwood Wash. We arrived back at the vehicle before it got dark and drove back to our campsite north of Oak Butte. All in all, it was a difficult hike but the final climb section wasn't nearly as scary as we thought it would be based on what we heard from others who have hiked it. Gate Policy: If a gate is closed upon arrival, leave it closed after you go through. If it is open, leave it open. Leaving a closed gate open may put cattle in danger. Closing an open gate may cut them off from water. Please be respectful, leave gates as found. The exception is signage on the gate directing you otherwise. Check out the Official Route and Triplog. Note This is a more difficult hike. It would be unwise to attempt this without prior experience hiking. Leave No Trace and +Add a Triplog after your hike to support this local community. | |||||||||||||||||||||||||||||||||||||||||||||||||||||||||||||||||||||||||||||||||||||||||||||||||||||||||